Tuesday 31 December 2013

Gear storage - Petzl bucket bag

As well as being a self confessed gear freak I'm also a bit OCD when it comes to storage. 
"a place for everything and everything in its place" 


And these Petzl bucket bags fit the bill quite nicely as you can see. 

I've got 2 of the 35lt bags, one for the rigging line/block and dead eye sling and one for the arial rescue kit. So they will happily take 60m of 16mm line or 30m of 13mm, a harness, strop, spikes etc…

Then i have a few of the 25lt bags for tag lines, porta wrap, speed line stuff and other general lowering equipment. 

I also have one that goes out with me every work day regardless of task, this one contains full water proofs x2, sharpening kit, mini tool kit, first aid kit, felling wedges, spare tee shirt and I'm sure theres some other stuff in there as well. This one is going on for 3 years old now and has been fairly well abused but is holding its own pretty well.


I think that says a lot for the construction of these bags, they are pretty bomb proof. with a reinforced base and a thick waterproof outer they keep everything nice and dry from the ground up. They only have a drawstring top so are not rain proof but do keep out  the worst of it. Both sizes have a shoulder strap and two heavy duty carry handles that flop to the side when not in use, you can see these are stitched all the way down the side to the base so are not going to fall off in a hurry. 

When it comes to using these as an actual rope bag they are brilliant and work exactly as a rope bag should. they are rigid enough to stand up when empty, making spoiling the rope back in easy, the drawstring top is big enough to fold down over the outside so its completely out of the way. 


A nice touch that a lot of rope bags seem to miss out on. And if leaving at the base of the tree the top can be synched up to stop dirt/sawdust filling the bag and still the rope will pull out nicely. 


The bags also have a clear window on the outside for labelling, and a small zippered pocket on the outside. Yet to find much of a use for this as its quite small and fairly awkward to get into if the bag is full. 

There is also a small haul loop on the top of the bag and a small one inside, this one 
I find quite useful for tying the end of the line to, making it much easier to find.  

This is the only gear loop on the inside of the bag, so some might say it lacks some of the features of the other bags on the market, but I don't think that detracts from the use of the bag and I'm not a massive fan of having kit hanging off the bag anyway, as i think its a good way to loose stuff. 

So all in all a bomb proof bag that does what it says on the tin very well. But could potentially benefit from some internal/external gear racking. But for £25 - £35 you will struggle to get any better. 

Monday 30 December 2013

New toys - Dmm Pinto and Pinto Rig

Couple of new toys I brought recently, I've had a normal DMM Pinto since they came out, but have wanted the rig version for a while now.


I've used the pinto for redirects, both of the climbing and lowering line, mini haul systems and occasionally speed lines. Having a few at my disposal will just give me a few more options.
I know you shouldn't use personal climbing equipment for lowering and vice versa, but I have done previously in the past. But now I can use the rig, exclusively for rigging and the normal pintos just for climbing.


As a quick redirect or for small scale lowering, the rig will live on a DMM steel oval with a short lyon sling, set up like this it takes up little room on a harness and can be carried on the off chance you may need it, rather than having to wait for the groundy to dig it out of a bag and send it up. I used to do this with the normal sized pinto, which was fine but not ideal for a 16mm lowering rope.

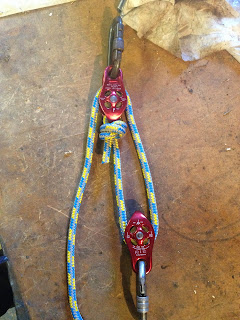
I was also toying with the idea of having a mini 2:1 haul system on 10mm line set up for pretensioning the lowing line and think that they would work well for that, especially as the beckets are rated. Just with 10m of rope or so in a mini stuff stack. Although this would obviously mean I could only then use them for rigging.


Something like this, but ideally I'd want to be able to quickly attach/detach it to the lowering line, anyone know of a 16mm mechanical ascender that would do the job?


Sunday 29 December 2013

Silky Saw Natanoko, review and mod

I love my silky saw, I use it in 99% of the trees I work on, sometimes its all I use, especially on reductions. 

This isn't really going to be a fair review as I have only used a handful of different silky's, but that is mostly because once I used the Natanoko I knew there was no point in trying anything else, it is a monster. 

It cuts quickly and effortlessly, its wide set teeth are perfect for larger diameter branches both dead and alive. The long sightly curved blade means you remove a lot of material for every stroke, making cuts quicker and easier. The blade has a nice rigidity to it meaning when cutting at awkward angles it maintains its angle of cut, something cheeper saws struggle to do. 

Now I'm sure other Silky saws do all of these things, but for some reason I have never got on with them, I either find them too small, to curved or too flexible.

As for other makes, well I personally wouldn't bother, they are generally cheaper for a reason. Buy cheap buy twice. I used to have a samurai brand one and the scabbard broke within a few weeks and the blade dulled very quickly. I've also used the CEUK ones and they are no better, very flexible blades that struggle to cut in a straight line and just make it look hard work. 

There are only a few faults that I can think of, Its not the best for very small diameter stuff as the teeth are fairly aggressive and it can if your not careful leave a ragged cut or tear the bark. But if I'm doing a small reduction with lots of small diameter branches I almost always have my Felcos on me anyway. 

The second flaw is with the scabbard, the hole at the bottom is not really big enough and sawdust does tend to accumulate occasionally leading to it blocking and preventing the saw from seating properly. Although this is easily fixed with a stanley knife

I also found i didn't really like the way it hung from my harness, it was always at the wrong angle or twisting itself round making it tricky to return the saw, especially if cutting and holding. 


This was easily fixed by removing the clip that came with it, and replacing with some 6mm accessory cord, a small wire gate wild country biner and a Karabiner retention rubber


This keeps everything low profile, no knots as its held in place by friction, and the alinement of the karabiner means that when clipped into my gear loop the scabbard is flush with my leg


Only a little thing, but when you think how many times you have to get your silky out in a day it makes a huge difference if its always in the right place facing the right way


Petzl Caritool - large vs small

The Petzl Caritool is a superb addition to any harness (assuming it fits) and one that I for one would hate to be without.

I started off with the small version, as it was cheaper and I worried the large one would be too big and get hooked on branches all the time. Surprisingly I have found the opposite to be true, the small one is fairly weak and as there is not a great deal of tension in the sprung clip I found it was forever clipping itself to branches, usually at the most inopportune moment! This frequently led to it snapping or the clip popping off.


After going through 3 or 4 of these in the space of a few months, I decided to try the large Caritool, hoping its heavier weight rating would also mean it was slightly more robust. I have been proved right, and have yet to break one, despite nearly 2 years worth of use. Which for £12ish is pretty damn good.
It also has a stronger clip, meaning branches are less likely to clip themselves in (it still happens, but not nearly as often!)

I have mine attached to the right hand side of my harness, just off centre from my hip, I use it exclusively for clipping my saw up and have developed a technique to do this one handed, quickly and easily (more on this when I do a post about my saw strop)

As stated before its robust, well made and currently standing the test of time, putting up with considerable abuse and must have been clipped into thousands of times by now. My main criticisms are firstly that I'd happily trade some weight gain for a solid gate rather than wire, as you'd be amazed how frequently tiny little branches can wedge themselves inside the wire gate!

My second criticism is one that I have in part managed to solve and its probably more to do with compatibility to my harness than anything else, but I found that it would often turn its self upside down or move around the harness webbing, or slide upwards and the little clip wasn't really sufficient to keep it in place.

I solved this with the addition of a strip of tire inner tube, cut to twice the width of the harness webbing and with two slits, centred and cut slightly further apart than one width of webbing, the caritool is then poked through one slit, into the harness and the other end stretched and round the caritool, the two ends of the rubber then get folded round the back of the harness strap and hopefully everything then stays happily in place


Hopefully the pictures explain it better than my ramblings


Shiny new blog/introduction

I already have a blog which I use to show the work I do, be it arboriculture, forestry or rustic furniture. My aim for this blog is to concentrate more on the technical side of tree climbing, the equipment and techniques used and how to make life in this industry easier and more efficient. 

I am by no means an expert, but do consider myself to be a confident and proficient climber, I have adopted many of the modern techniques thats have been developed in recent years, from the hitch climber to rope wrench and Single Rope Technique, I like to think I am always open to new ideas and will try anything if i think it may improve the way I work or just simply make life easier and enable me to work for longer. 

Which in part is why I have started this blog, I have worked with a lot of climbers over the years, some good, some not so good! But there is always something to learn, or a slightly different way of doing things you might not have considered before.

I welcome any comments, queries or criticisms and encourage you to contribute to the blog and what will hopefully in time become a resource for people new to the industry or someone simple looking for new ideas